So I've been doing a few leaks about this blog post on my community lately and I want to introduce to you my newest series. It's a series I call "Making the Photo". The series will run on this blog and this will show readers how to take and edit amazing photos using their cell phones. I'm starting with my daily driver, the Droid Bionic, which is known for it's average camera quality. I will first start by making all of my readers familiar with the tools I will use.
The Camera
 So people who use android know that all software camera's are not born equal. This is a generic blog post, and I used a camera that people can use on all phones. Android Authority has a download for your phone. It will get you the exact same camera that I'm using and the photo editor I use to make the photos look better.
The Gallery
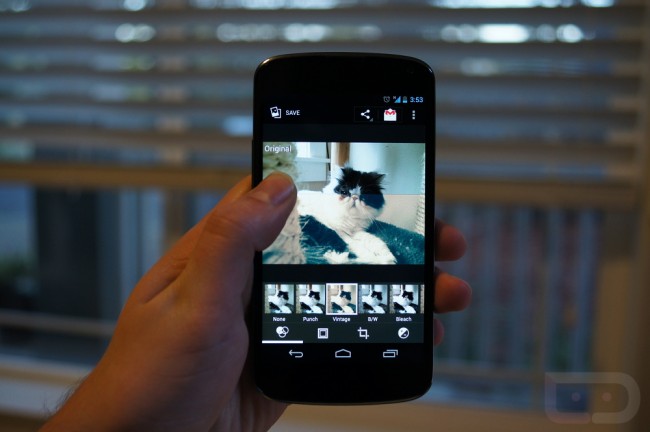 The Gallery is a connected the camera app download from android authority. Basically when you swipe the phone's camera over to the right you'll begin to go through all of your photos as if it's a film strip. Below is a video that is that perfectly explains all of the features I will use, so it would be perfect if you looked at that video first. I will attempt to make a video of my own going into further details after this blog is completed.
The Device
The device I'm using is the Droid Bionic. The Droid Bionic is a Motorola Phone for Verizon. It was released in November 2011. This was my first major Android phone, and I've loved it. I learned a lot about computing using it. It's no SIII or S4 in terms of camera quality, but it works well for this tutorial.
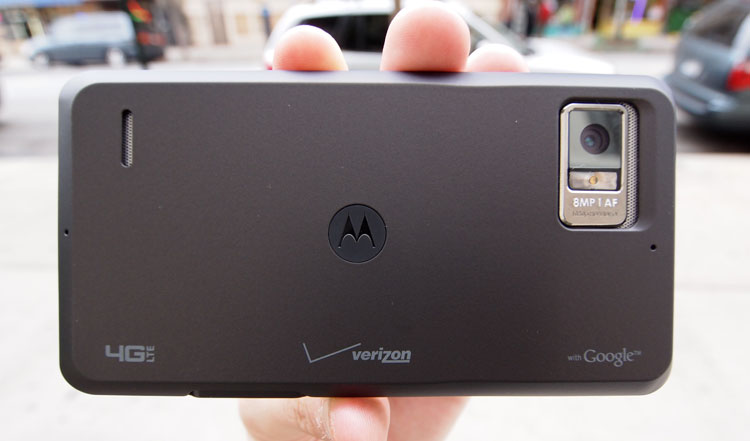 |
| This is the Bionic |
Your Comfort zone
So I can say that one of the biggest things you need to do is get out of your comfort zone. When I say this, I mean that you need to do things that you normally wont. Don't worry though. The things I ask of you will not be too much.
Skip to 1:50
Getting Down to Business
Okay, now that I've stated all of my tools, we can now begin to explain how you can take an make an amazing photo.
Before we begin this, keep in mind that every single picture here was taken and post processed on the smartphone. There was no Photoshop, illustrator, LightRoom, GIMP, or any other desktop editor used. I will bring up the topic of Snapseed in the next article, "Supercharging Your Photo", but I will not mention that particular mobile photo editing software this time.
Hopefully you looked at the video to learn how to take photos on using the camera that was available on Android Authority, because you're going to take your first set of photos right now. Also, I plan to split this chapter between philosophies then skill. To take a good photo, you need to do both.
Getting started
Philosophies
I remember hearing a quote from some unknown teacher, "You don't have to be excellent to get started, but you have to start to be excellent". This means that to be great at anything you have to try at least in the beginning. I think that philosophy is great for all components of life, but this particularly applies to this photo article. So this philosophy leads to the first exercise of the article:
Exercise I - Stop and take a photo:
After you download the photo the photo app from Android Authority and install it, immediately take a photo where you're at. So you can be at work or a on lunch break reading this article. Take a photo of the table you're at. Or take a picture of candy, a building out of the window, the hallway either at home or your office. Just make sure you take a picture. It will get you off to a rough start.
Here's some photos I took a while ago of my personal area:


I know the pictures are bad, but you can't expect your pictures to be amazing from the start (though they could be). These pictures are representation of some random fun times. You'll probably take your pictures in some random way. Remember another step of the path to amazing photos is about changing your perspective. I took some other pictures another time and these are my results:
Exercise II - Take a photo, but change your perspective:
 |
| That's cool guy Luis and my roommate Ross(in the green shirt) at the NASA hackathon |

So these photos still aren't amazing. They're not supposed to be, but they are better than my last set of photos. I basically changed my perspective to create a different photo. Changing perspectives is the main component to doing anything great, but changing perspectives is especially a key to taking a good photo. In fact, often times I feel like the philosophies and methods used for taking good photos are the methods you would use for doing amazing in many things.
Capturing the Moment
Being ready for random situations is crucial for good photography. You will be surprised at all the things you can do with in the moment situations. You can capture an animal doing something rare, see a random car go by or watch your child walk for the first time. Having a camera phone in your pocket makes that rather easy, but this also requires you to look around and pay attention to your surroundings. That is something many people don't do. Here are some photos that are in the moment. These photos weren't taken with any mind for skill, but I they turned out decently.
Exercise III - Capture any moment you can:
Take a photo of any situation you can. Make sure it's a scenic moment and/or moment you want to remember for a long time. This could take a day, or take a week. You will be doing this along with the rest of the exercises. This exercise can be done along side skill exercises:
 |
| There's Zachariah (Zach) He was also in my team |
 |
| Civil Rights March Anniversary |
 |
| Celebrating Brian's Birthday (Guy in birthday hat) |
 |
| Coming from the birthday party |
 |
| Best Looking Sky I have Ever Seen |
So besides the last two, the pictures are only "decent". I wouldn't have taken any of those photos IF I had not payed any attention to current situation. Most of the great photos you'll remember are photos taken in the moment. The next part would deal a lot with the skill aspect and not the philosophies of taking great photos
Skill
Beside the philosophy of taking a great photo, you have to use a decent amount of skill for taking a photo. For the most part the skills you use are broken into separate parts: Focus, Lighting, Colors, and Composition. I hope to teach you about each of these separate parts. So let's jump into it.
Focus
Generally speaking, the path to a great photo is drawing the audience's focus to a certain point. We basically do this one of two ways. We mess with the depth of field, or we change the composition. This will be a short look at the changing the focal length to give a nice effect called depth of field, which is just a stream of blur where ever your camera is not focused. You don't have to remember these things. All you just have to do is tap on what you want to focus on, and your camera will do all the work for you. Below are some images I took playing with the depth of field:
 |
| I have no clue what kind of plant this is. |
 |
| I love cake :-} |
 |
| Glad to go ninja on some Jones Soda |
The two photos above are actually starting to get to the point of good. Both of these photos used several elements, but the biggest elements is a change in perspective and change in focus. If you can do both of those, you can get a decent picture no matter what camera you have. So that leads to your next exercise.
Exercise IV - Changing Focus
Use the camera app from Android Authority to change the focus of your picture. You do this by tapping what you want to focus on. It would leave out the rest blurred out.
Lighting
Light is what makes a photo a photo. Well I think that it is what makes a photo great. You can see all good photos use tricks with lights. So the I will tell you a few tricks that will help you make an amazing photo.
Use Sunrise or Sunset lighting
I cannot stress that sunrise and sunset are both amazing times to take a photo. The plant photo above was taken during sunset as I was walking back from my local coffee shop.
These are a few other photos I took during sunset hours:
 |
| Such a beautiful building |
 |
| Nice shot of my sister |
So as you can see, these photos are looking pretty good. The main magic between all three of them is the lighting. Not only is the lighting for sunset nice and warm, it's also relatively uni-directional. Meaning it will shine mostly one surface, then leave a shadow everywhere else. This type of lighting can be used to add a great natural emphasis to anything you want.
Unidirectional Lighting
There's a such thing as unidirectional lighting. Basically it's when a light comes from one source and generates a massive shadow on anything it touches. This will draw attention to everything in the photo but for each different reasons. You'd first look at the brightest part of the main object of the photo, then the darkest side of the main object of the photo, lastly you'll look at the background. At least that's generally speaking. Check out a few photos I took using unidirectional lighting models. Just know that these models can happen naturally by jumping into the shade of anything and letting the light release from one direction:
 |
| This is of my mentee Jose at Imagine RIT. I personally think it's good for a festival |
 |
| Taking a picture of a window shadow |

So non of those photos were entirely unidirectional. They each had a dominating source of light.
Color
I'm running low on energy. I'm going to release color and composition in part II, as they're entire beast of their own. I will probably have to write my next article on those two the exact same size as this one. I'll catch you later in my next part of the series - Making the Photo: Generic Edition - Part II.
No comments:
Post a Comment